Horsezone News
HOW TO: Photograph Your Horse
From the November 2013 issue of The Stable Magazine - www.thestablemagazine.com/november2013
 It’s always nice to have good quality photos of your favourite horses and great images are extremely important if you are looking to advertise a stallion at stud or sell your horse!
Taking great photos is a bit of work, but well worth the effort. Some careful planning and preparation can turn average photos into fantastic photos, so we tell you how you can get the best out of your photography session!
The Setting
The setting will also have an affect on your end result. Pick a location to take your photos that is free of clutter. You want your horse to be the focus of the photo - not the horse behind him in the paddock - or the car in the background. The simpler the background, the better.
Want photos free lunging in the arena or round yard? Spend ten minutes picking up any manure before you start. Avoid photographing your horse in front of any paddock related rubbish, machinery, or sub-standard fencing - particularly if the photo is to be used to market your horse. Horse people will notice these things, and first impressions are very important.
Ensure the lighting is adequate. Indoor arenas can be tricky - so if you’re not experienced, opt for a photo shoot utilising good natural light.
PHOTOGRAPHY TIP #1 - THE BASICS:
Keep the sun behind you and use it to light your subject. Take care not to cast shadows on your subject, and avoid having your subject in a combination of sun and shade.
The purpose of your photos
If you’re taking your photos as mementos or to frame to put on your wall - have a little fun with your photos. Try different angles, different settings, portrait shots, paddock photos and ridden shots.
If you’re looking to sell your horse or stand your stallion at stud, you want to ensure your horse’s best features are on show! Part of this can be in the preparation for your photos (see ‘grooming’ later on), and part of it is ensuring your handler can show off the horse to the best of the ability.
Equipment
It’s a good idea to have all the gear you need on hand, and to have thought about what other equipment might be handy. A helper and some horse treats and/or a bucket of feed is also a good idea. Pick a nice bright day to take your photos, and allow plenty of time to get your photos just right - don’t rush! Choose your horse’s wardrobe in advance, and make sure your gear is clean and sparkling!
Depending on the camera you’ll be using, you might have to adjust the settings before getting snap-happy. Years ago when you could only use an SLR camera, you’d go through a lot of film before getting one good photo. Now, you can even get decent quality photos from your smart phone - and new ‘point and click’ cameras can prove very helpful - even the budget option cameras offer auto-focus and other handy features for use in different lighting conditions. Always read your camera manual or camera app instructions to make sure you get the best possible photos utilising all of the options available to you.
PHOTOGRAPHY TIP #2 - KEEP IT SIMPLE:
 The focus of your photo should be on the subject. (In this case, the horse and rider.) Keep backgrounds clean and simple.
Natural lighting is always the best option, so make good use of it!
Grooming
Even horses in paddocks au natural look great - but if you spend a bit of extra time grooming and trimming before you take your photos, you’ll reap the rewards! How do you want your horse to look? If you’re going for sporty and athletic, have the mane neatly pulled, and the tail trimmed. To show off your horse to the max, plait him up! Think about how you want your horse presented.
Timing Action Shots
Action photos of your horse or of you riding are great for the scrapbook or to post straight to Facebook (when you get a good one without ‘riding face!’) but they can be difficult to take. The timing of your photo will depend on your type of camera and the settings you have. If you have a camera that you can program, increasing your shutter speed or setting the camera to take a series of multiple photos can produce great results. The lighting will also affect the speed and quality of your photos, so take a few practice shots and adjust your settings accordingly.
The easiest thing to try and do is take a shot when the horse has his leading leg extended. It takes some practice, and you have to get used to your camera’s timing, but it’s wonderful when an action photo comes out right! When taking jumping photos, aim to get the horse and rider just rising over the jump - leave it too late and the decent doesn’t make as nice a photo. Practice makes perfect!
Have a helper on hand
Sometimes you just need an extra pair of hands, and when you’re taking great photos - this is one of those occasions. A helper can assist to hold you horse how you’d like, to ensure he is standing square, and obviously, to take photos of you when you’re the one in the saddle.
It’s helpful to choose a helper who is confident and capable handling your horse. Your horse can also help to get your horse’s attention - by (carefully) waving a whip, throwing grass up into the breeze, or shaking car keys. Photos where your horse is alert, bright and looking at the camera are the ultimate goal!
Angles
Horses can look pretty strange from some angles. Unless you want very abstract ‘arty’ shots, go with a simple side on portrait. You should always take heaps of photos from different angles, but keep yourself near the horse’s eye level for the best results. Experiment with angles to find your horse’s best side!
Try this...
Choosing a lower viewpoint for horses in motion can really give you a special shot. Hopefully, if your camera has a zoom function, you needn’t put yourself amongst moving hooves, so experiment a little. Showjumping photos from close to ground level, looking up to capture the horse and rider (from ground level to the tip of the rider’s helmet) from a slight side on angle can give you great results.
View From The Top
If your horse is quiet, shooting a ‘rider’s eye view’ photo is a must! Particularly if you choose a scenic view, you’ll be able to capture a special moment shared between you and your horse. Even better - you’ll have an original work of art to get printed (and enlarged) to hang on your wall!
PHOTOGRAPHY TIP #3 - SOMETHING DIFFERENT:
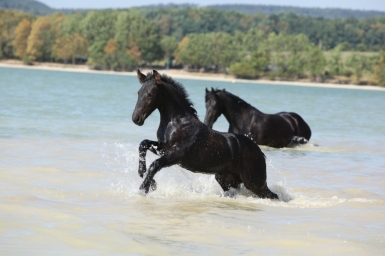 So we don’t all have our own private beach... but you can make the best of the scenery available to you. Think outside the box - just make sure your photo shoot is safe for horse and photographer!
Classy Portraits
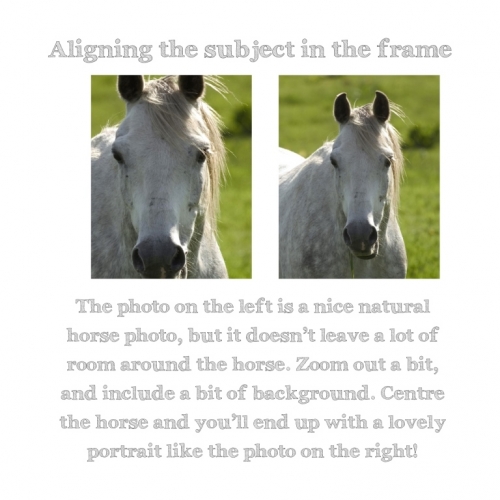
If you’re taking a portrait of your horse’s head, include some neck in the photo. You can always crop the photo later. Before you press the button, make sure your horse is the central object in the photo - and that he’s not too far away. Make sure you’ve got everything from the hooves, to the tail - to the tips of the ears well in the frame if you’re taking a full body photo. Leave some room around the horse to include a bit of background.
Horse Treats = Feed Slobber
Using horse feed in a bucket is great bribery for getting a horse’s attention, but be aware that..
A) Chewing horses in photos look really odd - and..
B) That feed slobber is not desirable and/or attractive.
Capture the moment - and your horse’s character
The idea behind taking a photo for you to keep as a memento is to capture the moment. Sure, as horse people we tend to have some stranger photos in our collection (if we find veterinary procedures and injuries fascinating) or from the time we decided to load the miniature pony onto the tray of the ute - but the whole purpose is to capture special moments, and your horse’s character.
PHOTOGRAPHY TIP #4 - ‘ARTY’ PHOTOS:
So interesting and attractive if done well.. Useless if not! Try close up shots and experiment. After all, if you like your photos, that’s all that really matters!
After Effects
If you’re a smart cookie who is savvy with the good old computer (you can’t be too bad, because you’re reading this online!) you can have a go at using a program such as Adobe Photoshop to edit your images. There are plenty of useful tools to help correct red-eye, virtually ‘clean’ your photos (remove that terrible looking fence or manure) and enhance colours and lighting. Not so much of a whiz? The Stable Design can fix your images from as little as $3. Details can be found at www.thestablemagazine.com/design
This article was originally published in the November 2013 issue of The Stable Magazine – Australia’s FREE Online Horse Magazine. Read this article and many more online at www.thestablemagazine.com/november2013

News Search
Categories
- General
- Event Results
- Stallionzone
- Sponsored Shows
- Clubs
- Health
- Feature Horses
- Competitions
- Five Minutes With Horsezone
- Young Riders
- Reviews
- Training and Clinics
- Postcards from the saddle
- 2014 Equitana by HORSE FIRST
- 2013 Equitana
- 2012 Equitana
- 2012 London
- 2011 Equitana
- 2011 Queensland Floods
- 2010 WEG